Creating NFTs with Free and Open Source Software

An unusual educational opportunity came to Linux Professional Institute (LPI) over the summer of 2021. Two interns–Alex, a Public Relations student and myself, Rozilyn, studying electrical and computer engineering–decided to create a set of NFTs as a learning excercise. This article describes the tools used by Alex and I in enough detail that you can try them out yourself.
Until we started our internships, Alex and I didn’t know any more about NFTs than what we had casually read in the press. When we decided to do an NFT project for our internships, we had to quickly come up to speed on cryptocurrencies: graphics that could be licensed through NFTs, and NFT contracts. In this posting, I’ll describe the technologies used to 1) create the artwork, and 2) write a smart contract that can mint (i.e. create) the NFTs for the corresponding images.
LPI has no plans to use or distribute these NFTs at present, but images of a dressed-up Tux penguin make for an appealing and fun summer project to help young IT professionals learn more about emerging technologies.
The Development Process
Convenient tools exist for developing NFTs and smart contracts, which can be used by those with limited technical skills. For example, OpenSea and Rarible make it easy to create and market NFTs. In our case, because our primary goal was to learn the technology, we opted for using open-source tools and going through the process more manually. By the summer’s end, we:
- Created artwork for LPI based on a CC-licensed image of the popular Tux penguin representing Linux
- Created NFTs with a customized Solidity contract
- Deployed and verified the contract on a public test network (testnet)
- Minted NFTs that our testers could manage in their wallets
The rest of this posting walks through how we created a series of NFTs using entirely open-source tools.
Creating the Images
For the artwork, we adopted the method common to many popular existing NFTs (e.g., CryptoPunks and CryptoKitties): Generating a random combination of attributes to customize a base image. This process creates several variations of a common character or theme in a series of NFTs.
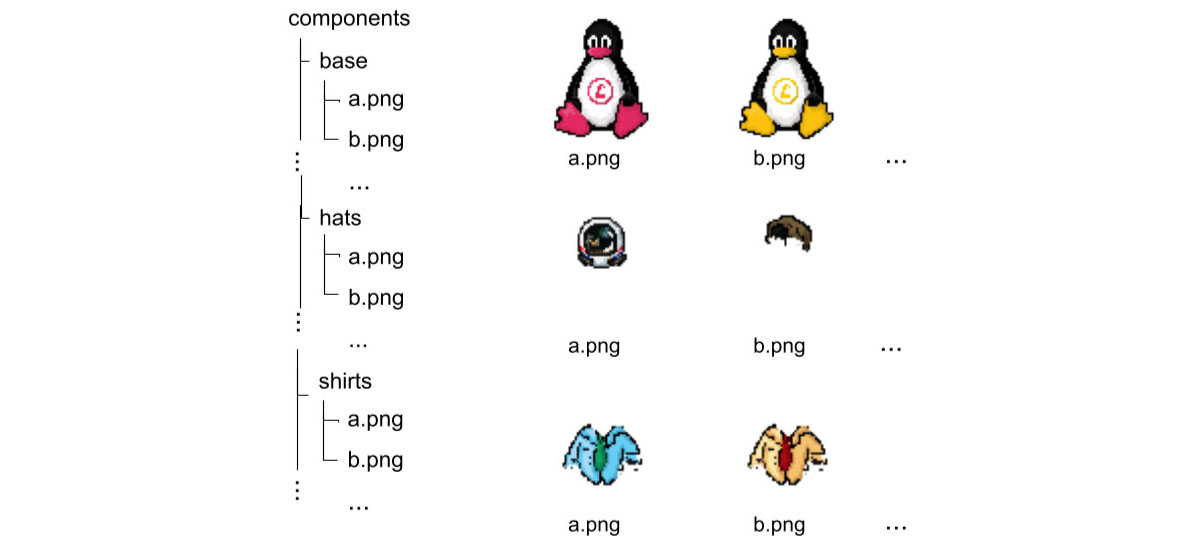
Alex created the images for the base Tux and additional attributes using GIMP and GraphicsMagick. The images were organized into designated directories (Figure 1) for each area of Tux that Alex customized: shirts, pants, hats, beak, flippers, and so on.
The final images were created using a Bash script. First, the script randomly selected one out of several base images of Tux. Then the script overlaid one attribute from each attribute directory onto the base image and saved the final, combined image. Since we were picking random attributes, the script also checks before saving the new image that the new combination of attributes did not repeat an existing combination. The entire process is repeated until the desired number of images is fulfilled.
The GraphicsMagick gm composite command combined the images. Since the gm command works with one base image and only one overlay image at a time, the script made wrapped calls to the command in a loop (Figure 2) to have the resulting image include multiple attributes.

The key command-line tools used in the script were:
- sort: Used with the little-known –random-sort or -R option, this command returns the attributes in each directory in a randomized order.
- head: This command selects the first image from the previously mentioned, randomly ordered list.
- sed: A streaming text editor, this command creates the metadata file from the template (shown below), by replacing ##TOKENNUM## and ##TOKENURI## with the current number and URI for the image the script is currently generating.
Each NFT was supplemented by documentation specifying its title, description, and image URI (similar to an address). These details were implemented in our smart contract using a metadata file specified in the ERC-721 JSON standard for NFTs, as seen in the following sample:
{
“title”: “MyToken”,
“type”: “object”,
“properties”: {
“name”: {
“type”: “string”,
“description”: “MyToken ###TOKENNUM##”
},
“description”: {
“type”: “string”,
“description”: “MyToken ###TOKENNUM##”
},
“image”: {
“type”: “string”,
“description”: “##TOKENURI##”
}
}
}
Example 1: NFT template metadata file for sed to transform
While we opted for our metadata files to solely contain the base provided by the ERC-721 standard, you may want to include different, unique features in your own.
Writing an NFT Contract
Smart contracts are software programs that are stored and executed on a blockchain network. This software is used to add additional features to transactions, such as allowing the licensee to transfer NFTs to other people. Smart contracts can serve a wide variety of possible functions, including facilitating the storage of transaction information on the network, verifying ownerships, and transferring tokens.
The main tools and resources that I used to create the contracts were:
- OpenZeppellin: Described on Zeppelin’s website as “an open-source framework for building secure smart contracts”, this project provides documentation, libraries, and support for the construction of smart contracts on decentralized blockchain networks.
- Solidity: Used by me to create our smart contracts, this is the programming language for both the sample work and OpenZeppelin’s Contracts Wizard. It is also commonly known for its usage in writing and implementing smart contracts in general.
- Truffle: Described as a “personal blockchain for Ethereum development you can use to deploy contracts, develop your applications, and run tests”, Truffle provides an isolated environment to test smart contracts prior to deployment on an active blockchain. You can use Truffle to compile, deploy, and interact with your software on your local system.
- Ganache: A subset of the Truffle ecosystem, this is a developer environment and command-line tool that assists in the development, testing, and deployment of safe (that is, secure) smart contracts on a local (personal) Truffle blockchain network. Developers using Ganache gain the added benefit of not requiring personal test or real ether (ETH), the cryptocurrency used on the Ethereum blockchain. Avoiding ether is convenient for reasons outlined in the following sections.
- Ropsten: This is a public Ethereum testnet. We used it in our final testing phase, as it has the closest resemblance to the Ethereum Mainnet. Ropsten is the only proof-of-work testnet. It requires developers to have personal test cryptocurrency.
- Etherscan: This is a search engine that allows you to view contracts, tokens, accounts, transactions, and blocks stored on Ethereum Mainnet or testnets. Because Etherscan can search for smart contracts, it can be used after deploying your own to verify that the contract has successfully become active.
- MetaMask: A blockchain wallet–much like those in real life–that acts as digital storage for information that provides access to assets (the assets themselves are stored on a blockchain). Metamask is a wallet specified for the Ethereum blockchain in the form of a browser plugin and mobile app that allows users to view or transfer (and swap, when on the Mainnet) assets.
Creating and interacting with a smart contract for an NFT is very manageable using OpenZeppellin’s smart contracts documentation and Contract Wizard, with or without knowledge of Solidity. However, with a working knowledge of Solidity, a programmer can easily add their own customizations to the generated contracts.
For example, the code produced by the wizard for a contract includes a function for minting the tokens, safeMint. The function mints only one token at a time. Thus, to mint 10,000 tokens, you have to call the mint function 10,000 times. I added the following code written to a contract to handle multiple mints at once:
function mintMany(uint256 num, address to) public onlyOwner {
for (uint256 i = 0; i < num; i++){
safeMint(to);
}
}
Example 2: Basic custom contract function sample
One of the more important features to note on the Contract Wizard is selecting your contract’s token standard. Standards have been developed for tokens to keep their contracts compatible with each other and to ensure that they provide the basic functionality (ex. minting, owning, transferring, tracking, etc). ERC-721 is the standard interface when creating non-fungible tokens–that is, tokens that cannot be used interchangeably but are each unique–and was what we selected when creating a contract with the wizard.
Transactions on a blockchain network have an associated cost in a given cryptocurrency. This fee is commonly referred to as gas. For the Ethereum blockchain, ether is the currency used to pay the gas fee in the unit of gwei, equivalent to 10E-9 ether.
With the current market value of ether (ETH, the coin used on the Ethereum blockchain), it is relatively expensive to deploy contracts. So when you do it on the Ethereum Mainnet, you’d want to be certain there won’t be any issues or errors that would cause you to have to redo a transaction. You pay the gas whether or not a transaction is successful.
Taking the financial costs into account, if you’re just learning how to interact with blockchain networks, you wouldn’t want to do your practice on the Mainnet. Instead, you would likely do so on a testnet where you can pay gas fees with test ether that has no real value.
Therefore, in order of testing, we first learned the basics of deploying and interacting with the sample contracts provided by OpenZeppellin on Ganache, a local, personal network. Then, after some practice, we moved to Ropsten, a public test network.
Because our testnet of choice was Ropsten, we needed currency to use on the network–in this case, ropsten ether (rETH). Unlike normal ETH, rETH can be obtained for free using rETH faucets. These faucets allow you to enter the address you wish to transfer the test ether to, typically once every 24 hours. This delay is part of what makes Ganache’s wait-free network ideal for initial experimentation. There are various faucets that drip different amounts at different time intervals. The faucets we used were:
- MyCrypto: Can request 0.01 RopstenETH as frequently as you’d like
- Dimensions Network Faucet: Can request 5 rETH every 24 hours
- Ropsten Ethereum Faucet: Can request 1 rETH every 24 hours
After you have your test ether to cover the gas price, you can then proceed with deployment to your chosen public testnet. You can confirm and see your work using Etherscan and MetaMask by using the contract address from the deployment receipt (see the following Javascript output from deploying the contract) to search for your contract (Figure 3) and import your tokens to your wallet (Figure 4).
2_deploy.js
===========
Deploying ‘MyToken’
– – – – – – – –
> transaction hash: 0x1b2f67de68204ae3c137985379103ce8435a51a45452f624487e13b182ab2052
> Blocks: 1 Seconds: 18
> contract address: 0x3dd50Bcb9E125f1B7537f257fB6f4C165a02cB0f
> block number: 10822250
> block timestamp: 1628784232
> account: 0x6dfA9B40F8a6AC500BcD0F09Bfa7709c6bD74dBC
> balance: 16.44630489
> gas used: 3171561 (0x3064e9)
> gas price: 20 gwei
> value sent: 0 ETH
> total cost: 0.06343122 ETH
> Saving artifacts
– – – – – – – – – – – – – – – – – – – – –
> Total cost: 0.06343122 ETH
Example 3: JS output (deployment receipt) from deploying MyToken contract


You can verify your deployed contract manually on Etherscan; however, we had difficulties doing so as our contract had imported files. Running the following Truffle command on the command line was successful and effortless:
truffle run verify
Verifying your contract makes the code public on Etherscan, allows for transparency with users, and gives them the ability to query and write to available public functions. Although there are various functions to have publicly accessible in your smart contract, the only one we included in our test contract was for non-owners to be able to transfer their NFT.
While testing, the first way we found to transfer a token from one owner to another was by connecting to Web3, via MetaMask or WalletConnect (both Web3 wallets), on Etherscan and using the safeTransferFrom function with the wallet account number of the NFT owner, the account to transfer to, and the NFT’s ID. We successfully transferred an MTK token (after a 0.00010114 rETH gas fee) using this method.
An alternative method, which is potentially more user friendly, is MetaMask’s own “Send” feature. Noting that this functionally is currently available only on the mobile app and not the extension.
We noted with concern that functions that should only be usable for the contract owner were publicly available functions – specifically the ownership and the minting functions. While all functions can and should be publically viewable for transparency, only the NFT owner should have access to privileged functions. So I attempted to use the previously mentioned mintMany function with an account that was not the owner of the contract, and appropriately, the transaction was not successful. To its credit, MetaMask advised against attempting the transaction, warning, “This transaction is expected to fail. Trying to execute it is expected to be expensive but fail, and is not recommended.” After we continued anyway, the transaction did indeed report “Fail with error ‘Ownable: caller is not the owner‘”.
Conclusion
While we have made significant progress in developing our understanding of NFTs, smart contracts, and testnets, this work has been only the beginning of our understanding of the development and implementation of NFTs. NFTs and other smart contracts can be very intricate, flaws can be subtle and dangerous, and there are always more features to add. However, changing a contract once it is deployed is quite difficult.
This was a fun project for us as interns. It gave us the opportunity to demystify a lot of the jargon and confusion around NFTs, and to learn how to create them. Given the enormous interest in cryptocurrencies and smart contracts, the knowledge we obtained can be very useful in our development as young IT professionals. We definitely learned a lot from our internships at LPI, and hopefully will get another project to work on in this area someday